- Mon 09 July 2012
- Cartographica
- Rick Jones
- #vector, #workflow
When creating maps that involve drawing new features such as points, lines, and polygons it is often the case that you may want to create several new features that are exactly the same. Essentially, you may want to create identical features without having to re-draw each one. Cartographica has multiple functions that allow you to perform this task. I will illustrate with an example using polygons.
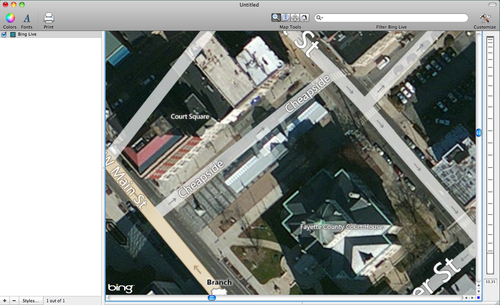
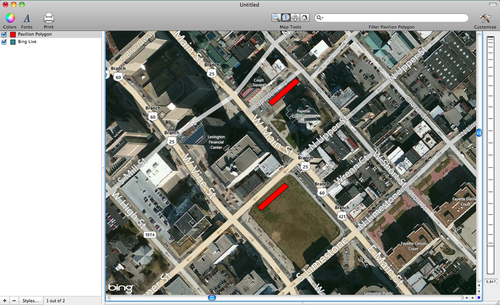
There is a pavilion structure in downtown Lexington, Ky that is used for various events, one being its hosting of the local Farmer's Market on specific days throughout the week. In Lexington, one of the goals of the local Farmer's Market is to create a permanent location that would include multiple outdoor structures like the pavilion along with other features that perform other functions such as bathrooms, offices, etc. In this scenario I wanted to know if there was a downtown location that could fit several structures of similar size to the already present pavilion venue to potentially host a permanent Farmer's Market. So My first task was creating a new polygon that outlined the shape and size of the already existing pavilion location. To do this I first added a live map by choosing File > Add Live Map. This gives me the base image to use to draw the new polygon. See the image below of the pavilion that we are going to use to trace the new polygon.
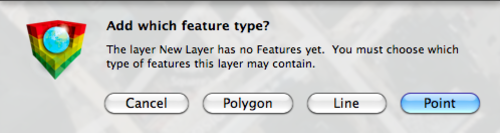
To draw the new polygon the first step is to click on the + button at the bottom of the layer stack. This will add a new layer that you can use to make the polygon. Once the new layer is added to the layer stack choose Edit > Add Feature. This will give you the option to choose the type of layer you would like to create. For this example we are going to create a new polygon layer. Select polygon from the window. See the image below for the window.
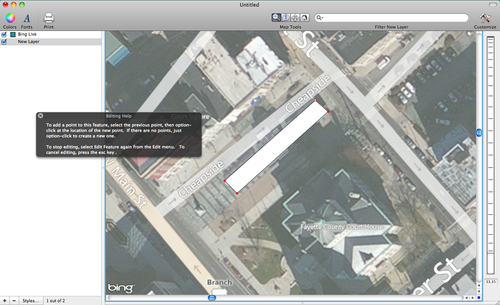
At this point the background image will dim a bit and you will be able to create the new polygon. To draw the new polygon hold down the option key and click to place points in locations that will draw the appropriate polygon shape. Once the points are in the appropriate location hit the enter key. See the following image for an example.
Now that you have the new polygon drawn, rename the layer in the layer stack to a more fitting name. For this example I named the new polygon Pavilion Polygon (Clever, huh?). Also, select the Bing Live layer in the layer stack and then under the Layer menu check the Include in Map Extent option. This will allow us to expand the extent of the map which will be helpful on the next step. When the map zooms outs, choose View > Zoom to Layer, this will automatically return you to the layer features you have drawn. Finally, move the Pavilion Polygon layer above the Bing Live layer in the Layer stack. We want our new polygon on top of the base map.
There are multiple methods for creating identical polygons features depending on what your goals are. The duplicate function which is used to create additional polygons on the same layer. This is most often of use when you are interested in creating features that share the same geometry (and/or attributes). The second way to make identical polygons is the "create layer from selected feature option". This is used when you want to create shapes on a new layer that are identical to shapes on the old layer. Most often, this is when "clipping" items from one layer to another, but it can also be used to create a subset of features for purposes of planning. Finally, there is the copy/paste method that is used for moving data between layers. Often, you will use this mechanism when you are trying to relocate things onto another layer. To make these features more clear I will demonstrate each within the example mentioned above.
Duplicate Function
To create an Identical polygon on the same layer select the previously created polygon by using the identify tool. Next, choose Edit > Duplicate. Next, use the identify tool to select the duplicated polygon (hint: it's right on top of the old one) and drag it to a new location. Notice in the image below we still only have one Pavilion layer in the layer stack, but a new polygon is now shown in the open field to the South.
Create Layer from Selection
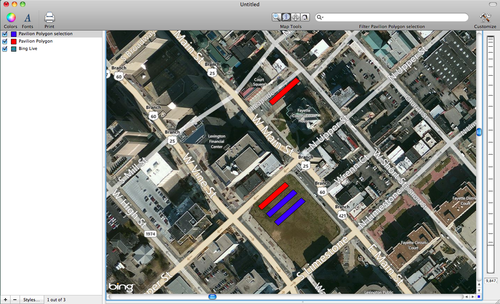
To create a new layer that contains an identical polygon select the original pavilion polygon feature by using the identify tool. Next, choose Layer > Create Layer from Selection. This will automatically add a new layer to the layer stack that contains an identical set of selected polygons (again, the new polygon is directly on top of the original pavilion polygon). Use the identify tool to select the new polygon layer and then choose Edit > Edit Selected Feature and then click and drag the polygon to its new location. Notice in the image below I have place the new polygon layer next to the one from the duplicate step in the open field to the South.

Copy and Paste
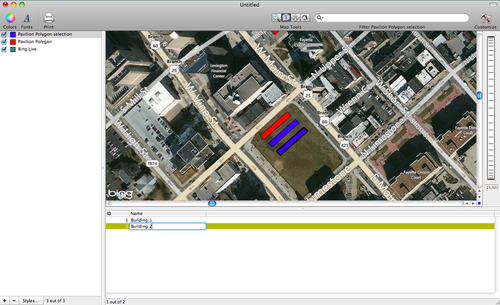
To copy and paste features from one layer to another first select the pavilion polygon layer in the layer stack. Next, use the identify tool to select the original pavilion polygon. Next, choose Edit > Copy and then select the Pavilion Polygon Selection layer in the layer stack and then choose Edit > Paste. This will add an identical polygon to the Pavilion Polygon selection layer. Next, use the identify tool to select the copied feature (again, it's on top of the original pavilion polygon feature) and then choose Edit > Edit Selected Feature and then click and drag the copied polygon to its new location. Again, notice that the polygon has been moved to the open field to the South. The result of this method is that we now have two separate layers that each contain two identical copies of the original pavilion polygon.
These features are all very useful for creating identical polygon features in the ways shown above. However, in performing the tasks above you have also completed a secondary task that deserves mentioning. This secondary task is the addition of feature attributes. Notice in the image below that the Pavilion Polygon selection layer has two rows which represent the two polygons on that layer. We can add additional columns of data to the polygon layers using several functions available in Cartographica. To add the Name column shown in the image below choose Layer > Add Columns. Next, choose Window > Show Layer Info, this will bring up a small window where you can change the name of the New Column to an appropriate name. To add the data to the new column simply click inside of the attribute window and type in the desired values. There are many other ways for adding additional data found under the Tools menu, or like we have seen here you can manually add data to your dataset. Depending on what your goals are Cartographica has a bevy of options that can help streamline your workflow, and help you produce professional quality maps and datasets.